

Collapsible content
Description
This kit can be used to integrate a custom Tesla button into an existing Type 2 connector. Make sure you can open the connector and that there is enough space inside to accommodate the electronic pressure and battery if needed. You need a 3V power supply or use a 3V battery! The electronics for use with a battery are different!
All components are waterproof. The kit uses a 3.3V source, you must have this available from your charging station via the charging cable or use the 3V battery (optional). The optional push buttons that come with the kit need a hole diameter of 16mm and they have a green LED ring. Buttons can be ordered in black and stainless steel.
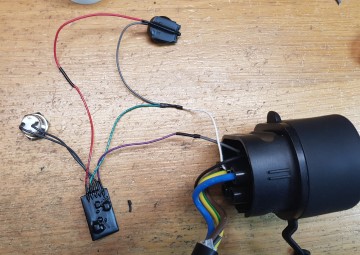
These are the connections to make when installing the kit:
Red cable to + 3.3 V (or battery red cable if available)
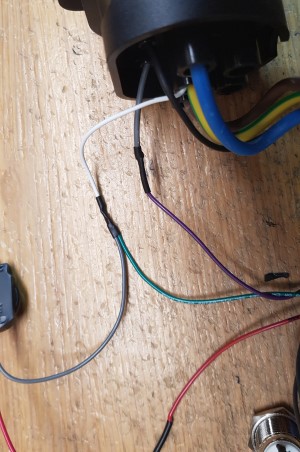
Green wire goes to the connector's PE connector (and the battery's gray cable if present)
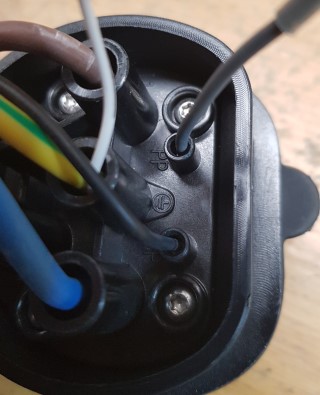
The purple wire goes to the PP terminal on the connector
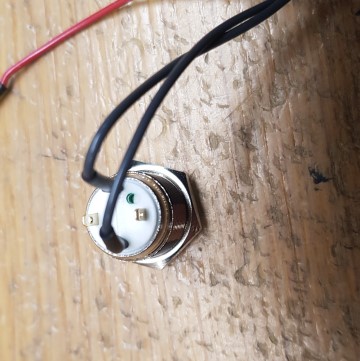
Gray wires go to the push button switch (see the green dot in the picture below).
To connect the green and purple wire, look inside the connector and you will see a wire running from the PP terminal to the PE (ground) terminal. There will be a resistance in the cable (220 Ohm for a 32A connector, 680 Ohm for a 16A version). You must cut both ends of the resistor to remove it from the wire. The correct resistance is provided by the electronic pressure. Connect the purple wire to the PP side wire and the green wire to the PE side of the wire you just cut. It is VERY important to use the correct connector, as a 32A connector on a 16A cable can overheat, while a 16A connector on a 32A cable only allows charging at 16A.
Specifications
| SKU | 11387 |
| GTIN | |
| Category | > |
FAQ
Links
Other
Delivery:
Items in stock are usually dispatched within 1–2 business days. The live stock status is always visible on our website.
Orders received before 1:00 PM are generally shipped the same day from our warehouse. Orders placed after this time or during weekends are processed the next business day. Please note that delivery times may vary depending on the selected shipping method and destination country, with a general delivery time of 1–3 business days for all stocked items. We cannot guarantee delivery within 3 days during periods of high demand or unexpected carrier delays.
Important to know:
Unfortunately, we can never guarantee that an accessory or spare part will fit your vehicle 100%. As long as the correct model and model year are selected, the part should fit – but variations may still occur. If you are unsure, we recommend contacting us before placing your order – we’re happy to help you check!
Do you want installation?
Contact us below to get quotation on mounting
- Choosing a selection results in a full page refresh.
- Opens in a new window.


