Innehåll som kan döljas
Description
Blistered sills are a common problem on Tesla Model Y. Our splash guards protect your Model Y from road salt, asphalt cracks, and other dirt thrown up by the wheels.
The splash guards blend in well with the rest of the car and look like they came straight from the factory. A popular and sought after accessory for your Tesla!
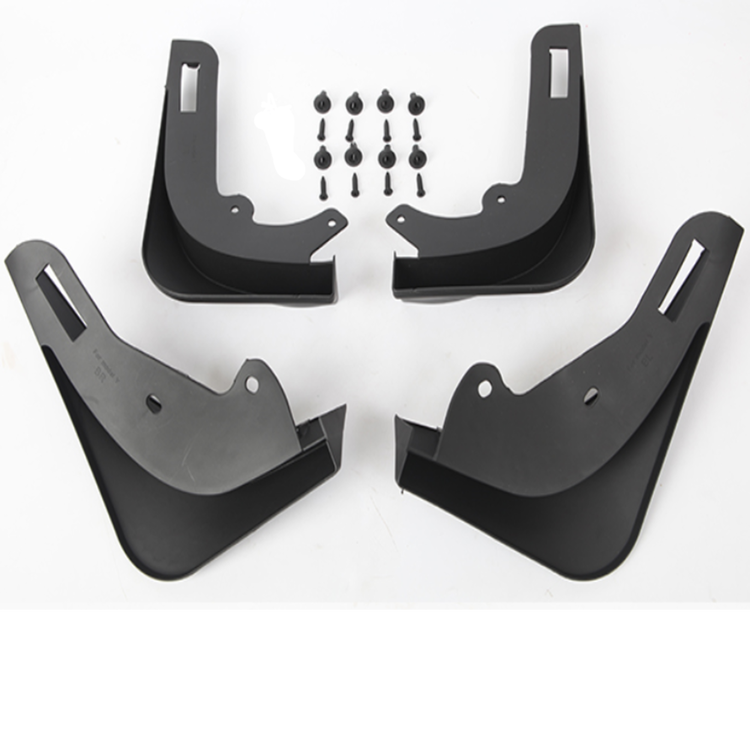
One set includes:
4 mudguards (2 front right/left & 2 rear right/left).
The mudguards are made of soft quality ABS plastic in a matte black look.
Protective film to place under the mudguards to protect the paint of the car.
Clips for mounting.
Assembly
The installation usually takes about 10 minutes for each mudguard for someone who has never worked with cars before.
Protective film (not necessary on Model Y)
When you install the protective film, the paint around the wheel arches must of course be clean!
Identify how much protective film you need.The length of the protective film is sufficient to mount on all four mudguards.
We usually recommend the following, cut the protective film into four equal parts. Each part can then be divided widthwise, this means that the set of protective film included is enough for the entire first year. We recommend that you change the protective film 1-2 times a year if you are very careful about the paint under the mudguards, preferably every time you change the tire. You can find more protective film HERE.
Hold the mudguards up to the car to identify how far into the paint the edge of the mudguard goes. Here, the ambition is to be as close to this edge as possible with the protective film as it is precisely the edge of the mudguards that you want to cover with the protective film.
The protective film has a thin plastic film on both sides of the film. First peel off the plastic film covering the adhesive side. Install the film in the desired location and then peel off the plastic that protects the surface of the protective film.
Front splash guards:
Start by removing the two clips on the inside of the wheel arch, holding the mudguards up against the car and the wheel arch. Press in the new clips that come in the package, then at the top of each mudguard there is a small notch. This should be folded behind the plate in the wheel arch.
Rear mudguard
For the rear mudguards, in addition to the clips inside the wheel arch, there is also a 10 mm screw at the bottom behind the wheel arch, which must be removed during installation. When the clips in the wheel arch and the screw underneath are removed, it is time to mount the mudguards.
Hold the mudguards up against the car and the wheel arch. Press in the new clips that come in the package, then at the top of each mudguard there is a small notch. This should be folded in behind the sheet metal in the wheel arch at the same time as the 10 mm screw at the back under the car should be screwed in again, this time with the mudguard in place in line with the hole so that the screw holds the mudguard in place.
If you want help with the installation, you must select the installation with the product above and the place of installation.
We will contact you to book a time for installation, allow about 1-2 weeks for the booked time.
Assembly time approx: 40 minutes.
Innehåll som kan döljas
Länkar
Innehåll som kan döljas
Specifications
| SKU | 10653 |
| GTIN | |
| Category | > Uncategorized |
Collapsible content
Delivery
Items in stock are usually shipped within 1-2 working days. You can always see the current stock balance live on the website.
Orders received before 1pm are usually shipped the same day from our warehouse. Orders completed after this time or on weekends are processed the next working day. Please note that delivery time may vary depending on the choice of shipping method, as well as the recipient country, with a general delivery time of 1-3 working days for all stocked items. We cannot guarantee delivery time within 3 days during peak periods or unexpected delays by the shipping company.
Önskar du montering?
Kontakta oss nedan för att få offert på montering


